Tutorial on simple Web application with RESTful API on JAVA
Intro
This is the tutorial that should have taken place in class on January 27th, 2015, but was not successful due to the problems with students computers.
The goal is to build a simple web application which has a pure HTML/Javascript web client (not hosted) and RESTful API written in JAVA with the help of Jersey REST Framework and Jetty Web Server. Java project will be managed by Maven.
Step 1: Get the source code
Each team has 4 four repositories:

Two of those repositories are specific (e.g. infsci2711\MultiDBs-FilesAPIs2DBs-Server and infsci2711\MultiDBs-FilesAPIs2DBs-WebClient for the MultiDBs-FilesAPIs2DBs team) for each team and the other two (infsci2711\MultiDBs-Utils and infsci2711\infsci2711.github.io) are shared between all teams.
The purpose of each respository (“FilesAPIs2DBs” part of the name will be different for each team):
-
infsci2711\MultiDBs-FilesAPIs2DBs-Server- repository where you put your Java code with RESTful APIs and business logic -
infsci2711\MultiDBs-FilesAPIs2DBs-WebClient- repostiry where you put your web client code (html/javascript/css/etc) -
infsci2711\MultiDBs-Utils(https://github.com/infsci2711/MultiDBs-Utils) - repository shared between all teams which contains all utility classes that might be useful for more than one team -
infsci2711\infsci2711.github.io- repository with the source code of the class website
Each member need to clone the first three repositories (the website repo is optional and might be needed if you will need to contribute to the class website). You will use your project specific repositories later when you work on your project, for this demo you only need the infsci2711\MultiDBs-Utils repository.
Also clone infsci2711\tutorial (https://github.com/infsci2711/tutorial) and infsci2711\tutorial-WebClient (https://github.com/infsci2711/tutorial-WebClient) repositories that will be used for this tutorial. Tutorial repositories resemble exactly the same structure as your team specific repositories, so you can play/mess around with tutorial before doing the actual work in your teams repos.
NOTE: if you cloned MultiDBs-Utils project before starting to read this tutorial and already did mvn install, then you might need to do git pull/sync and mvn install again on the MultiDBs-Utils project.
Step 2: Maven (apparently it is optional)
Java projects are managed by Maven and thus to build projects you need to use Maven. If you want to use Maven from command prompt (terminal), then follow installation instuctions on the Maven web site. However, as I learned it yesterday, you don’t need to install Maven separately if you only going to use it via an IDE (you need an IDE with maven though).
Step 3: IDE (with maven plugin)
You can use any IDE you want. I am going to show all examples with Eclipse. In any case, I believe, your IDE need to “understand” Maven projects. New version of Eclipse (after Kepler) and NetBeans have Maven plugin by default (I don’t know about the IntelliJ IDEA, but I am sure the situation is the same). If you have older version of Eclipse, for example, you can install m2eclipse plugin separately.
Step 4: Import projects to IDE
Import MultiDBs-Utils and tutorial projects to IDE. Here is how you can do that in Eclipse:
-
Open Eclipse
-
Select File->Import…
-
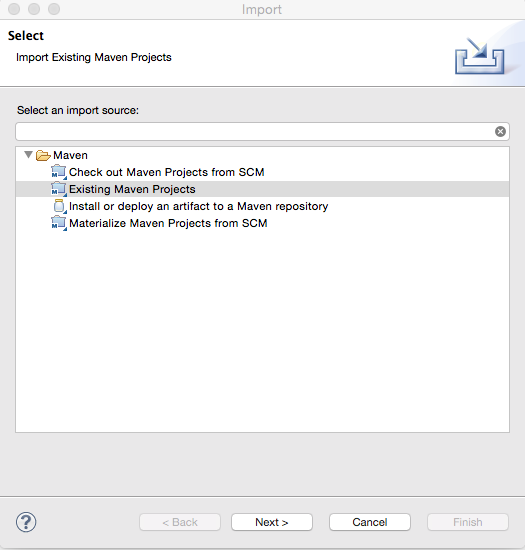
In the Import dialog type Maven in “type filet text” text box to filter all import source options and then select “Existing Maven Projects” and click Next
-
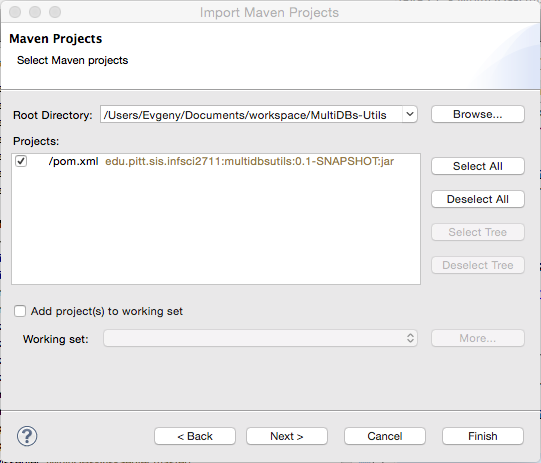
Click the Browse… button and select project folder.
For MultiDBs-Utils project the import dialog should look like this:
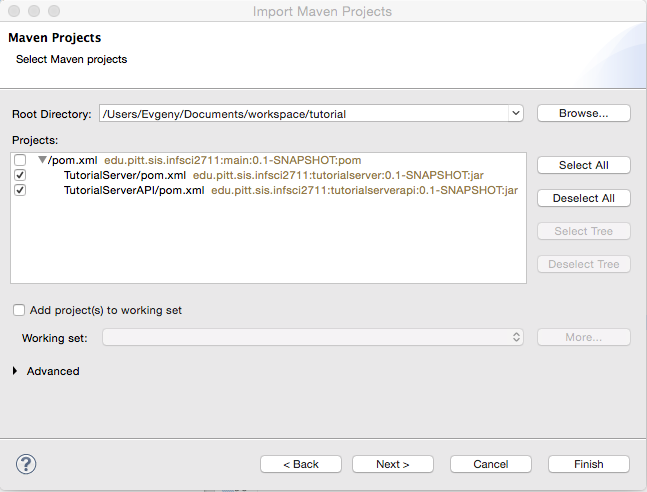
For tutorial project the import dialog should look like this (uncheck the root pom file):
-
Click Next and then Finish. You should see three projects in the Project Explorer (you might be missing target folders, but don’t worry about those):
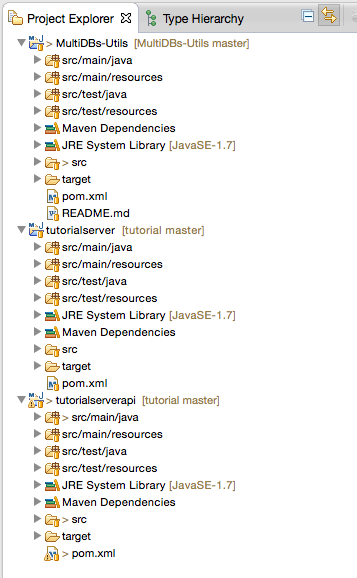
Each project has the same folder structure. Here is what each folder is used for:
-
src/main/java - is the place where all packages and business logic code will go
-
src/main/resources - is the place where resource files (e.g. logo, properties, etc.) will go
-
src/test/java - is the place where all packages and test code will go
-
src/main/java - is the place where resource files (e.g. logo, properties, etc.) that are needed for the test will go
The tutorial maven project actually consists of two maven modules (tutorialserver and tutorialserverapi) that now looks like just other normal java project:
-
tutorialserver project should be used for the business logic of your project without including any REST related stuff. Think of this a just a library that will be used in some other projects.
-
tutorialserverapi is the project that starts a web server and exposes RESTful API. No actual business logic that solve your team’s tasks should be in this. This project will depend on the tutorialserver.
Step 5: Maven Install MultiDBs-Utils proejct
We are going to use some utility classes from MultiDBs_Utils project in our tutorial project. Since we just cloned the Utils project, it is not available in our local maven repository. There are two options to install that project:
-
Using maven via command prompt (terminal):
-
open command prompt (terminal)
-
cd to the location of the MultiDBs_Utils project
-
type
mvn install
-
OR
-
Using IDE:
- Right click on the MultiDBs-Utils project in Eclipse
- Select Run As -> Maven Install
If everything worked correctly you should see a message in terminal or in console output similar to this one:
[INFO] -----------------------------------------
[INFO] BUILD SUCCESS
[INFO] ------------------------------------------
[INFO] Total time: 2.087s
[INFO] Finished at: Wed Jan 28 13:24:40 CST 2015
[INFO] Final Memory: 8M/19M
[INFO] ------------------------------------------
Step 6: Add MultiDBs-Utils and tutorialserver as maven dependecny to tutorialserverapi project
- Open pom.xml file in the tutorialseverapi
- Find
<dependencies>tag - Add following two dependencies:
<dependency>
	<groupId>edu.pitt.sis.infsci2711</groupId>
	<artifactId>multidbsutils</artifactId>
	<version>0.1-SNAPSHOT</version>
</dependency>

<dependency>
	<groupId>edu.pitt.sis.infsci2711</groupId>
	<artifactId>tutorialserver</artifactId>
	<version>0.1-SNAPSHOT</version>
</dependency>
The first dependency is to the MultiDBs-Utils project since we need to use some classes from that project and the second dependency is to the tutorialserver project since that project will do all the work and the tutorialserverapi project will “forward” all request to it.
Step 7: Demo RESTful API call
Let’s work on the tutorialserverapi project first.
Right click on the src/main/java in the Project Explorer and select New -> Package to create a new package. In the New Java Package dialog enter the name of the new package as edu.pitt.sis.infsci2711.tutorial.
NOTE: all packages in your projects should have edu.pitt.sis.infsci2711.multidbs. prefix followed by your project name. E.g., all packages in the MultiDBs-FilesAPIs2DBs project should have this beginning: edu.pitt.sis.infsci2711.multidbs.filesapis2dbs
After you added the package, right click on it in the Project Explorer and select New -> Class. In the New Java Class dialog enter name for the new class as TutorialServer.
Do similar steps to add edu.pitt.sis.infsci2711.tutorial.rest package and DemoRestApi class in that package.
You should have project structure like this:
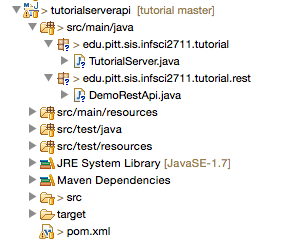
NOTE, CORRECTION: It is better to have prefix for the packages in the tutorialserverapi as edu.pitt.sis.infsci2711.tutorialapi. (see the added “api”).
—
Edit TutorialServer.java file to make it like this:
package edu.pitt.sis.infsci2711.tutorial;

import edu.pitt.sis.infsci2711.multidbs.utils.JerseyJettyServer;

public class TutorialServer {

	public static void main(final String[] args) throws Exception {
		JerseyJettyServer server = new JerseyJettyServer(7654, "edu.pitt.sis.infsci2711.tutorial.rest");
		server.start();
	}
}
What the above code will do is following:
-
create an instance of JerseyJettyServer class that is defined in the Utils project. The JerseyJettyServer starts an embedded Jetty server that listens on the provided port (7654) and will look for the REST API classes in the edu.pitt.sis.infsci2711.tutorial.rest package (we will create a demo API later)
-
starts the server with server.start()
Before we start our TutorialServer, let’s add a demo API first. Edit the DemoRestApi.java file like this:
package edu.pitt.sis.infsci2711.tutorial.rest;

import javax.ws.rs.GET;
import javax.ws.rs.Path;
import javax.ws.rs.Produces;
import javax.ws.rs.core.MediaType;
import javax.ws.rs.core.Response;

@Path("Demo/")
public class DemoRestApi {

	@Path("helloWorld")
	@GET
	@Produces(MediaType.APPLICATION_JSON)
	public Response helloWorld() {
		return Response.status(200).entity("{\"msg\" : \"Hello World\"}").build();
	}
}
In short the code above defines a root resource accesible with path “Demo” and a sub-resource accesible with path “helloWord” which his relative to the root path. The sub resource also annotated with @GET that designates that the resource is going to process HTTP GET requests and produce representation in JSON format. For more details please read Jersey docs and especially Chapter 3.
Now we can finally try to run our TutorialServer: right click on the TutorialServer.java in the Project Explorer and select Run As -> Java Application.
You should see similar output in the console tab:
2015-01-28 15:46:55.698:INFO::main: Logging initialized @740ms
2015-01-28 15:46:55.794:INFO:oejs.Server:main: jetty-9.2.3.v20140905
2015-01-28 15:46:55.843:INFO:oejsh.ContextHandler:main: Started o.e.j.s.ServletContextHandler@1de61363{/,null,AVAILABLE}
2015-01-28 15:46:55.867:INFO:oejs.ServerConnector:main: Started ServerConnector@67cd12fc{HTTP/1.1}{0.0.0.0:7654}
2015-01-28 15:46:55.867:INFO:oejs.Server:main: Started @912ms
To test the server, open a browser of your choice and type this url (port number might be different if you provided different value):
http://localhost:7654/Demo/helloWorldIn response you should see:
{"msg" : "Hello World"}Step 8: Person RESTful API Example
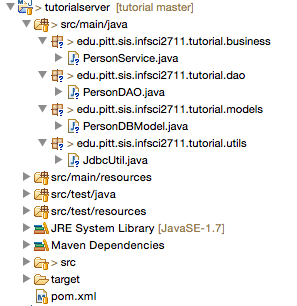
Now let’s do something more difficult and create simple business logic for CRUD operations on Persons. For that create the following four packages with one class in each of them in the tutorialserver project (not the API project):
- edu.pitt.sis.infsci2711.tutorial.business
- PersonService.java
- edu.pitt.sis.infsci2711.tutorial.dao
- PersonDAO.java
- edu.pitt.sis.infsci2711.tutorial.models
- PersonDBModel.java
- edu.pitt.sis.infsci2711.tutorial.utils
- JdbcUtil.java
The project should look like this in the Project Explorer:
Now edit the pom.xml file and add MySQL dependency:
<dependency>
	<groupId>mysql</groupId>
	<artifactId>mysql-connector-java</artifactId>
	<version>5.1.29</version>
</dependency>
Connect to MySQL databse in any way you like and run the following SQL script to create a database and a table for our example:
CREATE DATABASE  IF NOT EXISTS `infsci2711_tutorial` /*!40100 DEFAULT CHARACTER SET latin1 */;
USE `infsci2711_tutorial`;

DROP TABLE IF EXISTS `Person`;

CREATE TABLE `Person` (
  `id` int(11) NOT NULL AUTO_INCREMENT,
  `firstName` varchar(45) DEFAULT NULL,
  `lastName` varchar(45) DEFAULT NULL,
  PRIMARY KEY (`id`)
) ENGINE=InnoDB DEFAULT CHARSET=latin1;
And now let’s put some contents in those classes. First let’s start with the JdbcsUtil.java (don’t forget to change username and password to your mysql username and password):
package edu.pitt.sis.infsci2711.tutorial.utils;

import java.sql.Connection;
import java.sql.DriverManager;

public class JdbcUtil {
	public static final String DEFAULT_HOST = "localhost";

	public static final int DEFAULT_PORT = 3306;

	public static final String DEFAULT_USER = "USERNAME"; //CHANGE TO YOUR MYSQL USER NAME

	public static final String DEFAULT_PASSWOD = "PASSWORD"; // CHANGE TO YOUR MYSQL PASSWORD

	public static final String DEFAULT_DATABASE = "infsci2711_tutorial";

	public static Connection getConnection() throws Exception {
		Class.forName("com.mysql.jdbc.Driver");

		return DriverManager.getConnection(getConnectionString(), DEFAULT_USER, DEFAULT_PASSWOD);
	}

	public static String getConnectionString() {
		return String.format("jdbc:mysql://%s:%d/%s", DEFAULT_HOST, DEFAULT_PORT, DEFAULT_DATABASE);
	}
}
Now the PersonDBModel.java:
package edu.pitt.sis.infsci2711.tutorial.models;

public class PersonDBModel {

	private int id;
	private String firstName;
	private String lastName;

	public PersonDBModel() {

	}

	public PersonDBModel(final String firstName, final String lastName) {
		this.setFirstName(firstName);
		this.setLastName(lastName);
	}

	public PersonDBModel(final int id, final String firstName, final String lastName) {
		this.setId(id);
		this.setFirstName(firstName);
		this.setLastName(lastName);
	}

	public int getId() {
		return id;
	}

	public void setId(final int id) {
		this.id = id;
	}

	public String getFirstName() {
		return firstName;
	}

	public void setFirstName(final String firstName) {
		this.firstName = firstName;
	}

	public String getLastName() {
		return lastName;
	}

	public void setLastName(final String lastName) {
		this.lastName = lastName;
	}
}
Now the PersonDAO.java:
package edu.pitt.sis.infsci2711.tutorial.dao;

import java.sql.Connection;
import java.sql.ResultSet;
import java.sql.SQLException;
import java.sql.Statement;
import java.util.ArrayList;
import java.util.List;

import edu.pitt.sis.infsci2711.tutorial.models.PersonDBModel;
import edu.pitt.sis.infsci2711.tutorial.utils.JdbcUtil;

public class PersonDAO {

	public static List<PersonDBModel> findAll() throws SQLException, Exception {

		try (Connection connection = JdbcUtil.getConnection()) {
			String sql = "SELECT * FROM Person";
			try (Statement statement = connection.createStatement()){

				ResultSet resultSet = statement.executeQuery(sql);

				List<PersonDBModel> result = new ArrayList<PersonDBModel>();

				while (resultSet.next()) {
					result.add(new PersonDBModel(resultSet.getInt(1), resultSet.getString(2), resultSet.getString(3)));
				}

				return result;
			}
		}

	}

	public static PersonDBModel findById(final int id) throws SQLException, Exception {

		try (Connection connection = JdbcUtil.getConnection()) {
			String sql = "SELECT * FROM Person where id = " + id;
			try (Statement statement = connection.createStatement()){

				ResultSet resultSet = statement.executeQuery(sql);

				while (resultSet.next()) {
					return new PersonDBModel(resultSet.getInt(1), resultSet.getString(2), resultSet.getString(3));
				}

				return null;
			}
		}

	}

	public static int save(final PersonDBModel person) throws SQLException, Exception {

		try (Connection connection = JdbcUtil.getConnection()) {
			String sql = String.format("INSERT INTO Person (firstName, lastName) VALUES ('%s', '%s')", person.getFirstName(), person.getLastName());
			try (Statement statement = connection.createStatement()){

				int res = statement.executeUpdate(sql, Statement.RETURN_GENERATED_KEYS);

				ResultSet rs = statement.getGeneratedKeys();
				if (rs.next()){
					person.setId(rs.getInt(1));
				}

				return res;
			}
		}

	}
}
And now finally the PersonService.java:
package edu.pitt.sis.infsci2711.tutorial.business;

import java.sql.SQLException;
import java.util.List;

import edu.pitt.sis.infsci2711.tutorial.dao.PersonDAO;
import edu.pitt.sis.infsci2711.tutorial.models.PersonDBModel;

public class PersonService {

	public List<PersonDBModel> getAll() throws SQLException, Exception {
		List<PersonDBModel> result = PersonDAO.findAll();

		return result;
	}

	public PersonDBModel findById(final int id) throws SQLException, Exception {
		PersonDBModel result = PersonDAO.findById(id);

		return result;
	}

	public PersonDBModel add(final PersonDBModel person) throws SQLException, Exception {
		PersonDAO.save(person);

		return person;
	}
}
Let’s switch back to the tutorialserverapi project. Create new package in the tutorialserverapi project and name it edu.pitt.sis.infsci2711.tutorial.viewModels. Create Person class in that project with following content:
package edu.pitt.sis.infsci2711.tutorial.viewModels;

import javax.xml.bind.annotation.XmlRootElement;

@XmlRootElement
public class Person {

	private int id;
	private String firstName;
	private String lastName;

	public Person() {

	}

	public Person(final String firstName, final String lastName) {
		this.setFirstName(firstName);
		this.setLastName(lastName);
	}

	public Person(final int id, final String firstName, final String lastName) {
		this.setId(id);
		this.setFirstName(firstName);
		this.setLastName(lastName);
	}

	public int getId() {
		return id;
	}

	public void setId(final int id) {
		this.id = id;
	}

	public String getFirstName() {
		return firstName;
	}

	public void setFirstName(final String firstName) {
		this.firstName = firstName;
	}

	public String getLastName() {
		return lastName;
	}

	public void setLastName(final String lastName) {
		this.lastName = lastName;
	}
}
Create another class but in the edu.pitt.sis.infsci2711.tutorial.rest package and name it “PersonRestService” and populate it with the following content:
package edu.pitt.sis.infsci2711.tutorial.rest;

import java.util.ArrayList;
import java.util.List;

import javax.ws.rs.Consumes;
import javax.ws.rs.GET;
import javax.ws.rs.PUT;
import javax.ws.rs.Path;
import javax.ws.rs.PathParam;
import javax.ws.rs.Produces;
import javax.ws.rs.core.GenericEntity;
import javax.ws.rs.core.MediaType;
import javax.ws.rs.core.Response;

import edu.pitt.sis.infsci2711.tutorial.business.PersonService;
import edu.pitt.sis.infsci2711.tutorial.models.PersonDBModel;
import edu.pitt.sis.infsci2711.tutorial.viewModels.Person;

@Path("Person/")
public class PersonRestService {

	@GET
    @Produces(MediaType.APPLICATION_JSON)
	public Response allPersons() {

		PersonService personService = new PersonService();

		List<PersonDBModel> personsDB;
		try {
			personsDB = personService.getAll();

			List<Person> persons = convertDbToViewModel(personsDB);

			GenericEntity<List<Person>> entity = new GenericEntity<List<Person>>(persons) {};

			return Response.status(200).entity(entity).build();
		} catch (Exception e) {
			return Response.status(500).build();
		}

	}

	@Path("{id}")
	@GET
    @Produces(MediaType.APPLICATION_JSON)
	public Response personById(@PathParam("id") final int id) {

		PersonService personService = new PersonService();

		try {
			PersonDBModel personsDB = personService.findById(id);

			if (personsDB != null) {
				Person person = convertDbToViewModel(personsDB);

				return Response.status(200).entity(person).build();
			}
			return Response.status(404).entity("Person not found").build();
		} catch (Exception e) {
			return Response.status(500).build();
		}

	}

	@PUT
    @Produces(MediaType.APPLICATION_JSON)
	@Consumes(MediaType.APPLICATION_JSON)
	public Response addPerson(final Person person) {

		PersonService personService = new PersonService();

		try {
			PersonDBModel personsDB = personService.add(convertViewModelToDB(person));

			Person personInserted = convertDbToViewModel(personsDB);

			return Response.status(200).entity(personInserted).build();
		} catch (Exception e) {
			return Response.status(500).build();
		}

	}

	private PersonDBModel convertViewModelToDB(final Person person) {
		return new PersonDBModel(person.getFirstName(), person.getLastName());
	}

	private List<Person> convertDbToViewModel(final List<PersonDBModel> personsDB) {
		List<Person> result = new ArrayList<Person>();
		for(PersonDBModel personDB : personsDB) {
			result.add(convertDbToViewModel(personDB));
		}

		return result;
	}

	private Person convertDbToViewModel(final PersonDBModel personDB) {
		return new Person(personDB.getId(), personDB.getFirstName(), personDB.getLastName());
	}
}
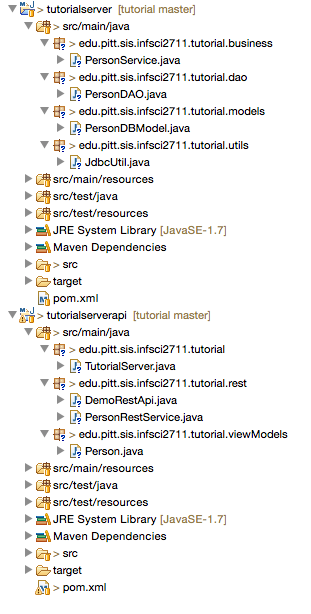
Here is how the project tree should look like:
Now start the TutorialServer and try this url in your browser http://localhost:7654/Person. This will send reques to our RESTful server and ask it to get all tuples from the Person table from MySQL.
As the result you should see this in your browser: []. That means that everything might have worked correctly, but at least is didn’t fail. We just don’t have any records in our database yet and that’s why we recieve an empty array.
In addition to find all person tuples, our Person RESTful API also exposes functionality to add a persion and to find a person by id.
First let’s try to find a person by id. Try this url: http://localhost:7654/Person/123. You should receive Person not found as the response.
There are many ways to test the functionality to add new person, but we cannot simply type another url in the browser, because we need to do a POST/PUT request and send some data to the server. Fast and easy way to do that is to use browser extensions. For the Google Chrome browser you can use REST Console and RESTClient for Firefox.
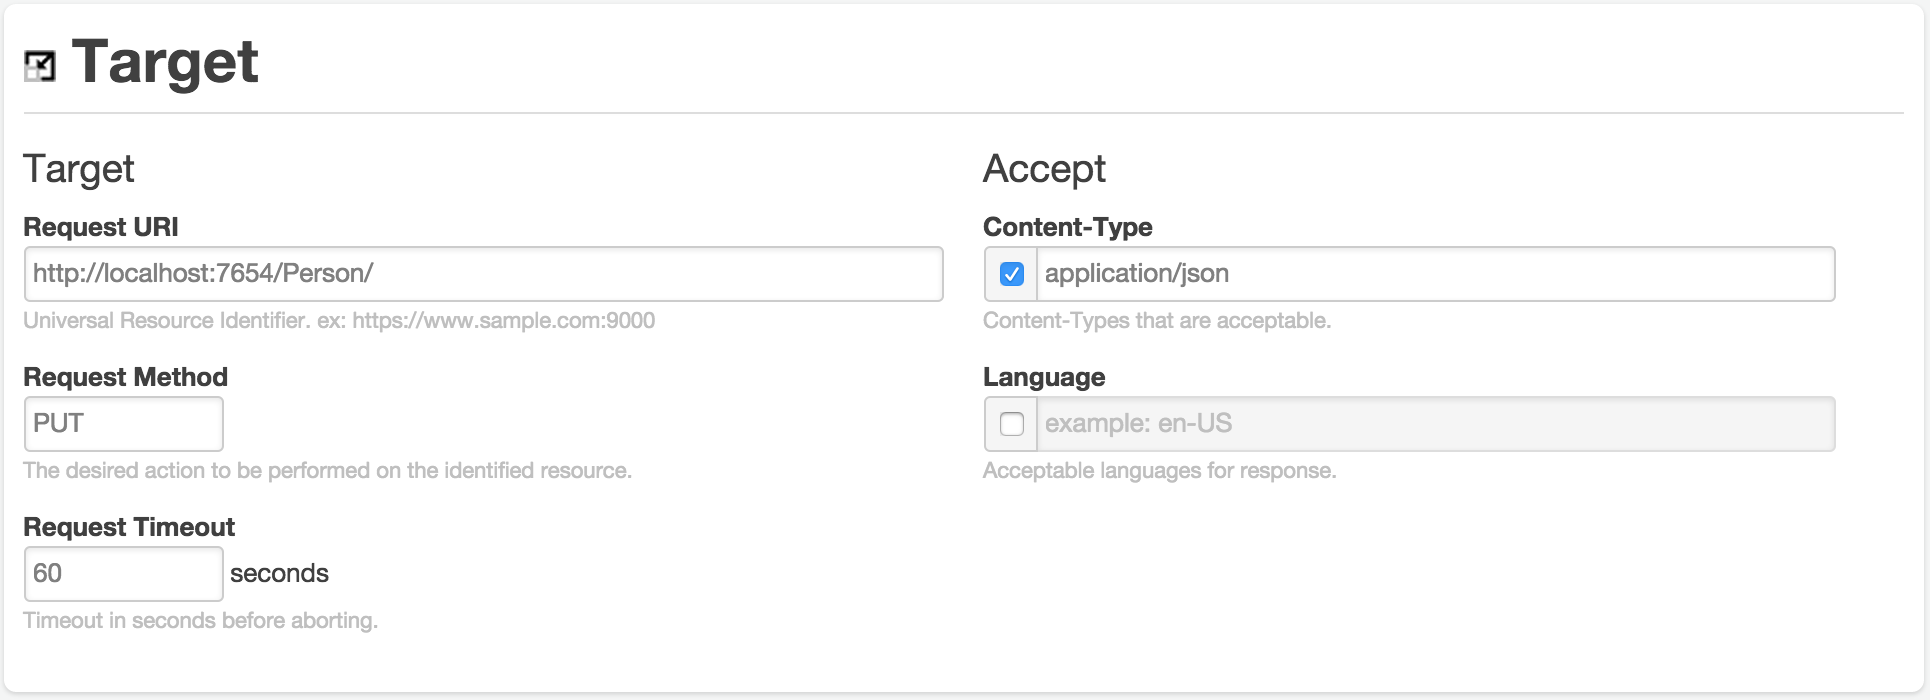
Here is an example how to use REST Console in Chrome:
Fill the Request URI, Accept and Request Method fields in the Target section:
Fill the Content-Type and Raw Body fields in the Body section:
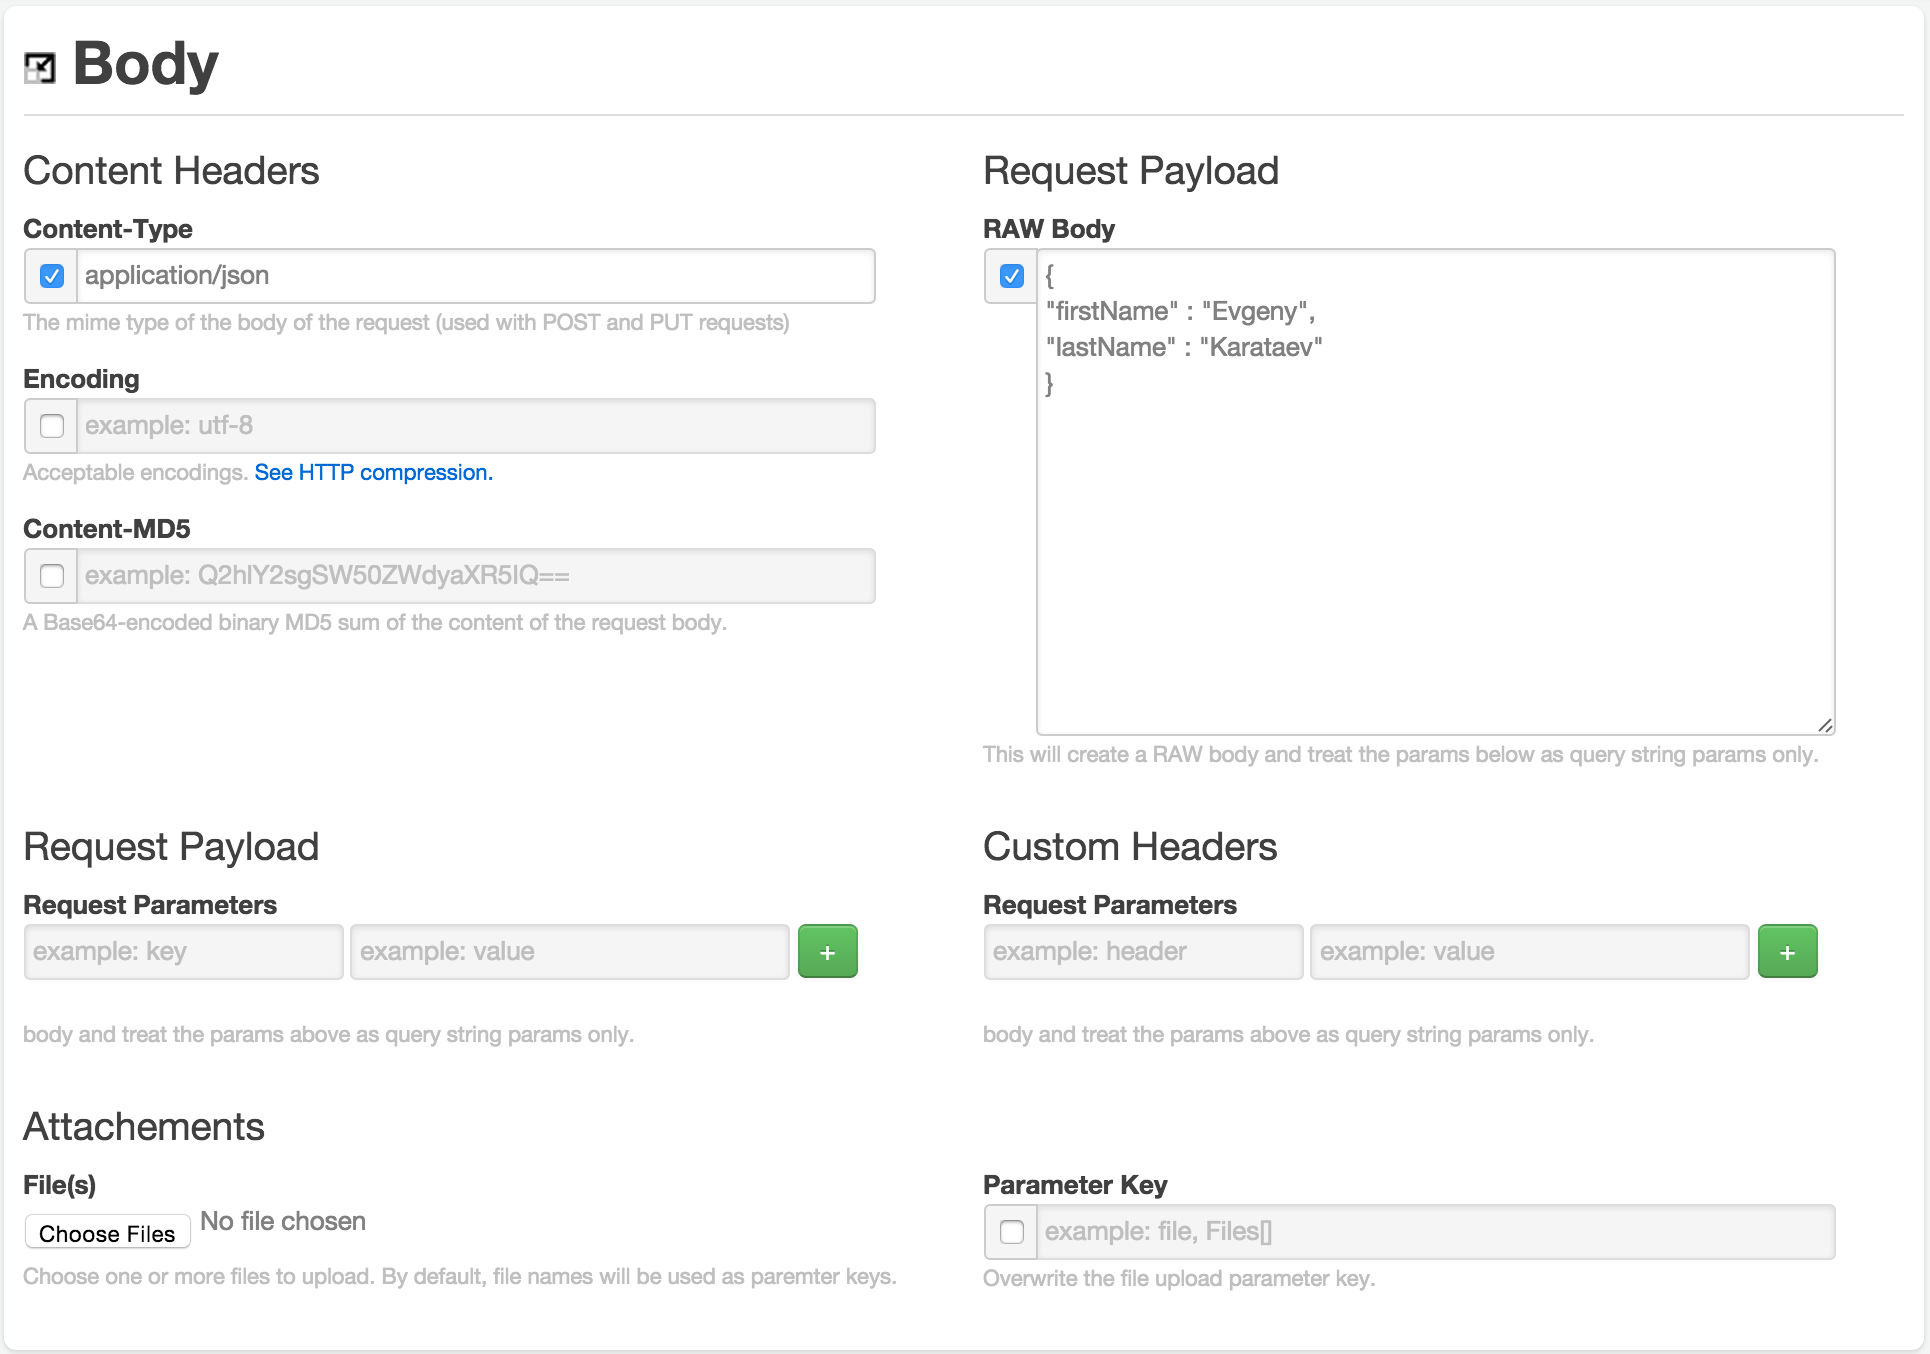
Click the PUT button and see the Response section:
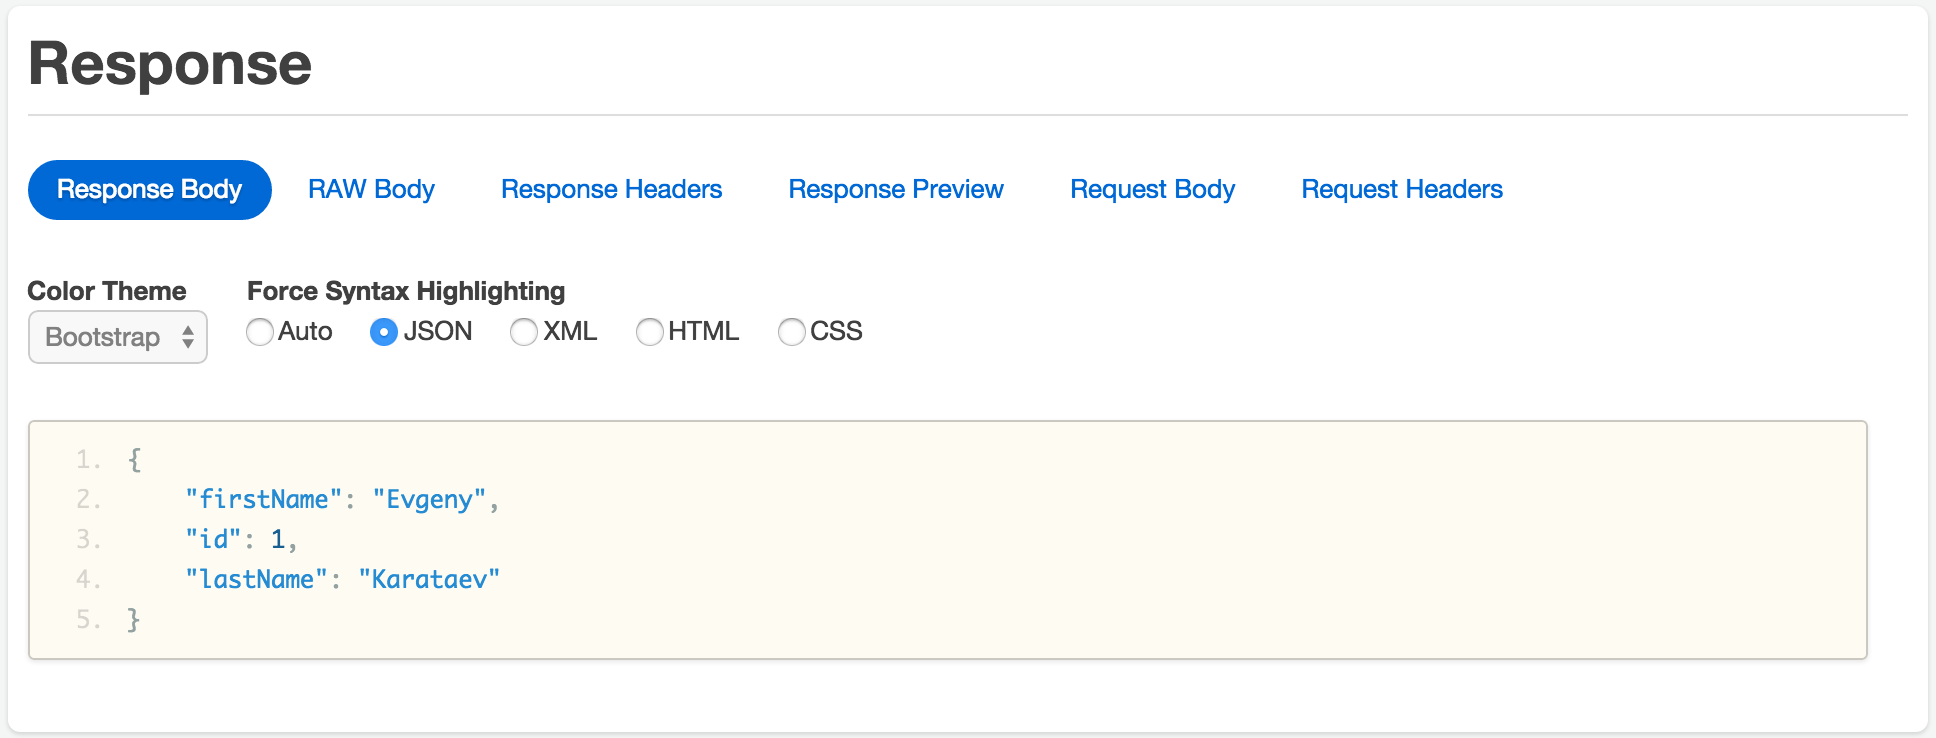
Now if everything worked correctly, you can try http://localhost:7654/Person again. The result should be similar to [{"firstName":"Evgeny","id":1,"lastName":"Karataev"}].
We are done with the back end, now we need to build the UI.
Step 9: Building web page with HTML/Javascript/Knockoutjs
Go to the folder where you cloned infsci2711\tutorial-WebClient to and create following directory structure (“/” means it is a folder, not a file):
tutorial-WebClient/
|-css/
|-javascripts/
  |-knockout_models/
That is basically: create css and javascripts folder under the tutorial-WebClient folder and knockout_models folder under javascripts folder.
Download knockoutjs and put knockout-3.2.0.js in the javascripts folder.
Download jQuery and put jquery-2.1.3.min.js in the javascripts folder.
Download bootstrap and put bootstrap.min.js in the javascripts folder and boostrap.min.css in the css folder.
Create text file (name it index.html) under the tutorial-WebClient folder and another text file (name it personViewModel.js) under the knockout_models
This is how the folder structure shoud look like:
tutorial-WebClient/
|-css/
	|- boostrap.min.css
|-javascripts/
  	|-knockout_models/
  		|- personViewModel.js
	|- bootstrap.min.js
	|- jquery-2.1.3.min.js
	|- knockout-3.2.0.js
|- index.html
Put the following content in the personViewModel.js file:
var restBaseUrl = "http://localhost:7654/";

function PersonViewModel(firstName, lastName) {
	var self = this;

	self.firstName = ko.observable(firstName);
	self.lastName = ko.observable(lastName);
}

function PersonsViewModel() {
	var self = this;

	self.people = ko.observableArray();

	self.newPerson = ko.observable(new PersonViewModel());

	self.findAll = function() {
		$.ajax({
			url: restBaseUrl + "Person",
			type: 'GET',
			dataType: 'json',
			contentType: "application/json",
			crossDomain: true,
			success: function(data) {
				self.people.removeAll();

				for (var i = 0; i < data.length; i++) {
					var person = new PersonViewModel(data[i].firstName, data[i].lastName);

					self.people.push(person);
				}
			},
			error: function(data) {
				alert("Something went wrong while getting persons list. Please try again.");
			}
		});
	};

	self.addPerson = function() {
		$.ajax({
			url: restBaseUrl + "Person",
			type: 'PUT',
			data: ko.toJSON(self.newPerson()),
			dataType: 'json',
			contentType: "application/json",
			crossDomain: true,
			success: function(data) {
				self.people.push(new PersonViewModel(data.firstName, data.lastName));
				self.newPerson(new PersonViewModel());
			},
			error: function(data) {
				alert("Something went wrong while adding new person. Please try again.");
			}
		});
	};

	self.findAll();
}

ko.applyBindings(new PersonsViewModel(), $("#personsContainer")[0]);
And the following content in the index.html file:
<!DOCTYPE html>
<html>
<head>
	<title>INFSCI 2711 Web Tutorial</title>

	<meta charset="utf-8">
	<meta name="viewport" content="width=device-width, initial-scale=1.0">
	<link href="css/bootstrap.min.css" rel="stylesheet" media="screen">
</head>
<body style="margin: 60px;">
	<div class="row">

		<div class="col-md-12">

			<div class="page-header">
			  <h1>This is INFSCI 2711 Tutorial on Web Applicaiton with RESTful API <br/><small>(with twitter bootstrap and knockouy.js)</small></h1>
			</div>

			<div id="personsContainer">
				<h3>
		        	There are <span data-bind="text: people().length"></span> persons in our databases.
		        	<button class="btn btn-default" data-bind="click: findAll">Refresh</button>
		    	</h3>

		    	<form class="form-inline">
					<!-- ko with: newPerson -->

					<input class="form-control" placeholder="Enter first name" data-bind="textInput: firstName">
					<input class="form-control" placeholder="Enter last name" data-bind="textInput: lastName">

					<!-- /ko -->

					<button type="submit" class="btn btn-default" data-bind="click: addPerson">Add Person</button>
				</form>

		    	<!-- ko if: people().length > 0 -->

		    	<table class="table table-striped table-hover">
		            <thead>
		                <tr>
		                	<th>#</th>
		                    <th>First Name</th>
		                    <th>Last Name</th>
		                </tr>
		            </thead>
		            <tbody data-bind="foreach: people">
		                <tr>
		                	<td data-bind="text: $index"></td>
		                    <td data-bind="text: firstName"></td>
		                    <td data-bind="text: lastName"></td>
		                </tr>
		            </tbody>
		        </table>

		        <!-- /ko -->

			</div>

		</div>

	</div>

    <script type="text/javascript" src="javascripts/jquery-2.1.3.min.js"></script>
    <script type="text/javascript" src="javascripts/bootstrap.min.js"></script>
    <script type="text/javascript" src="javascripts/knockout-3.2.0.js"></script>
    <script type="text/javascript" src="javascripts/knockout_models/personViewModel.js"></script>
</body>
</html>
Run the TutorialServer and then open index.html file in your browser. You should see something similar to this:
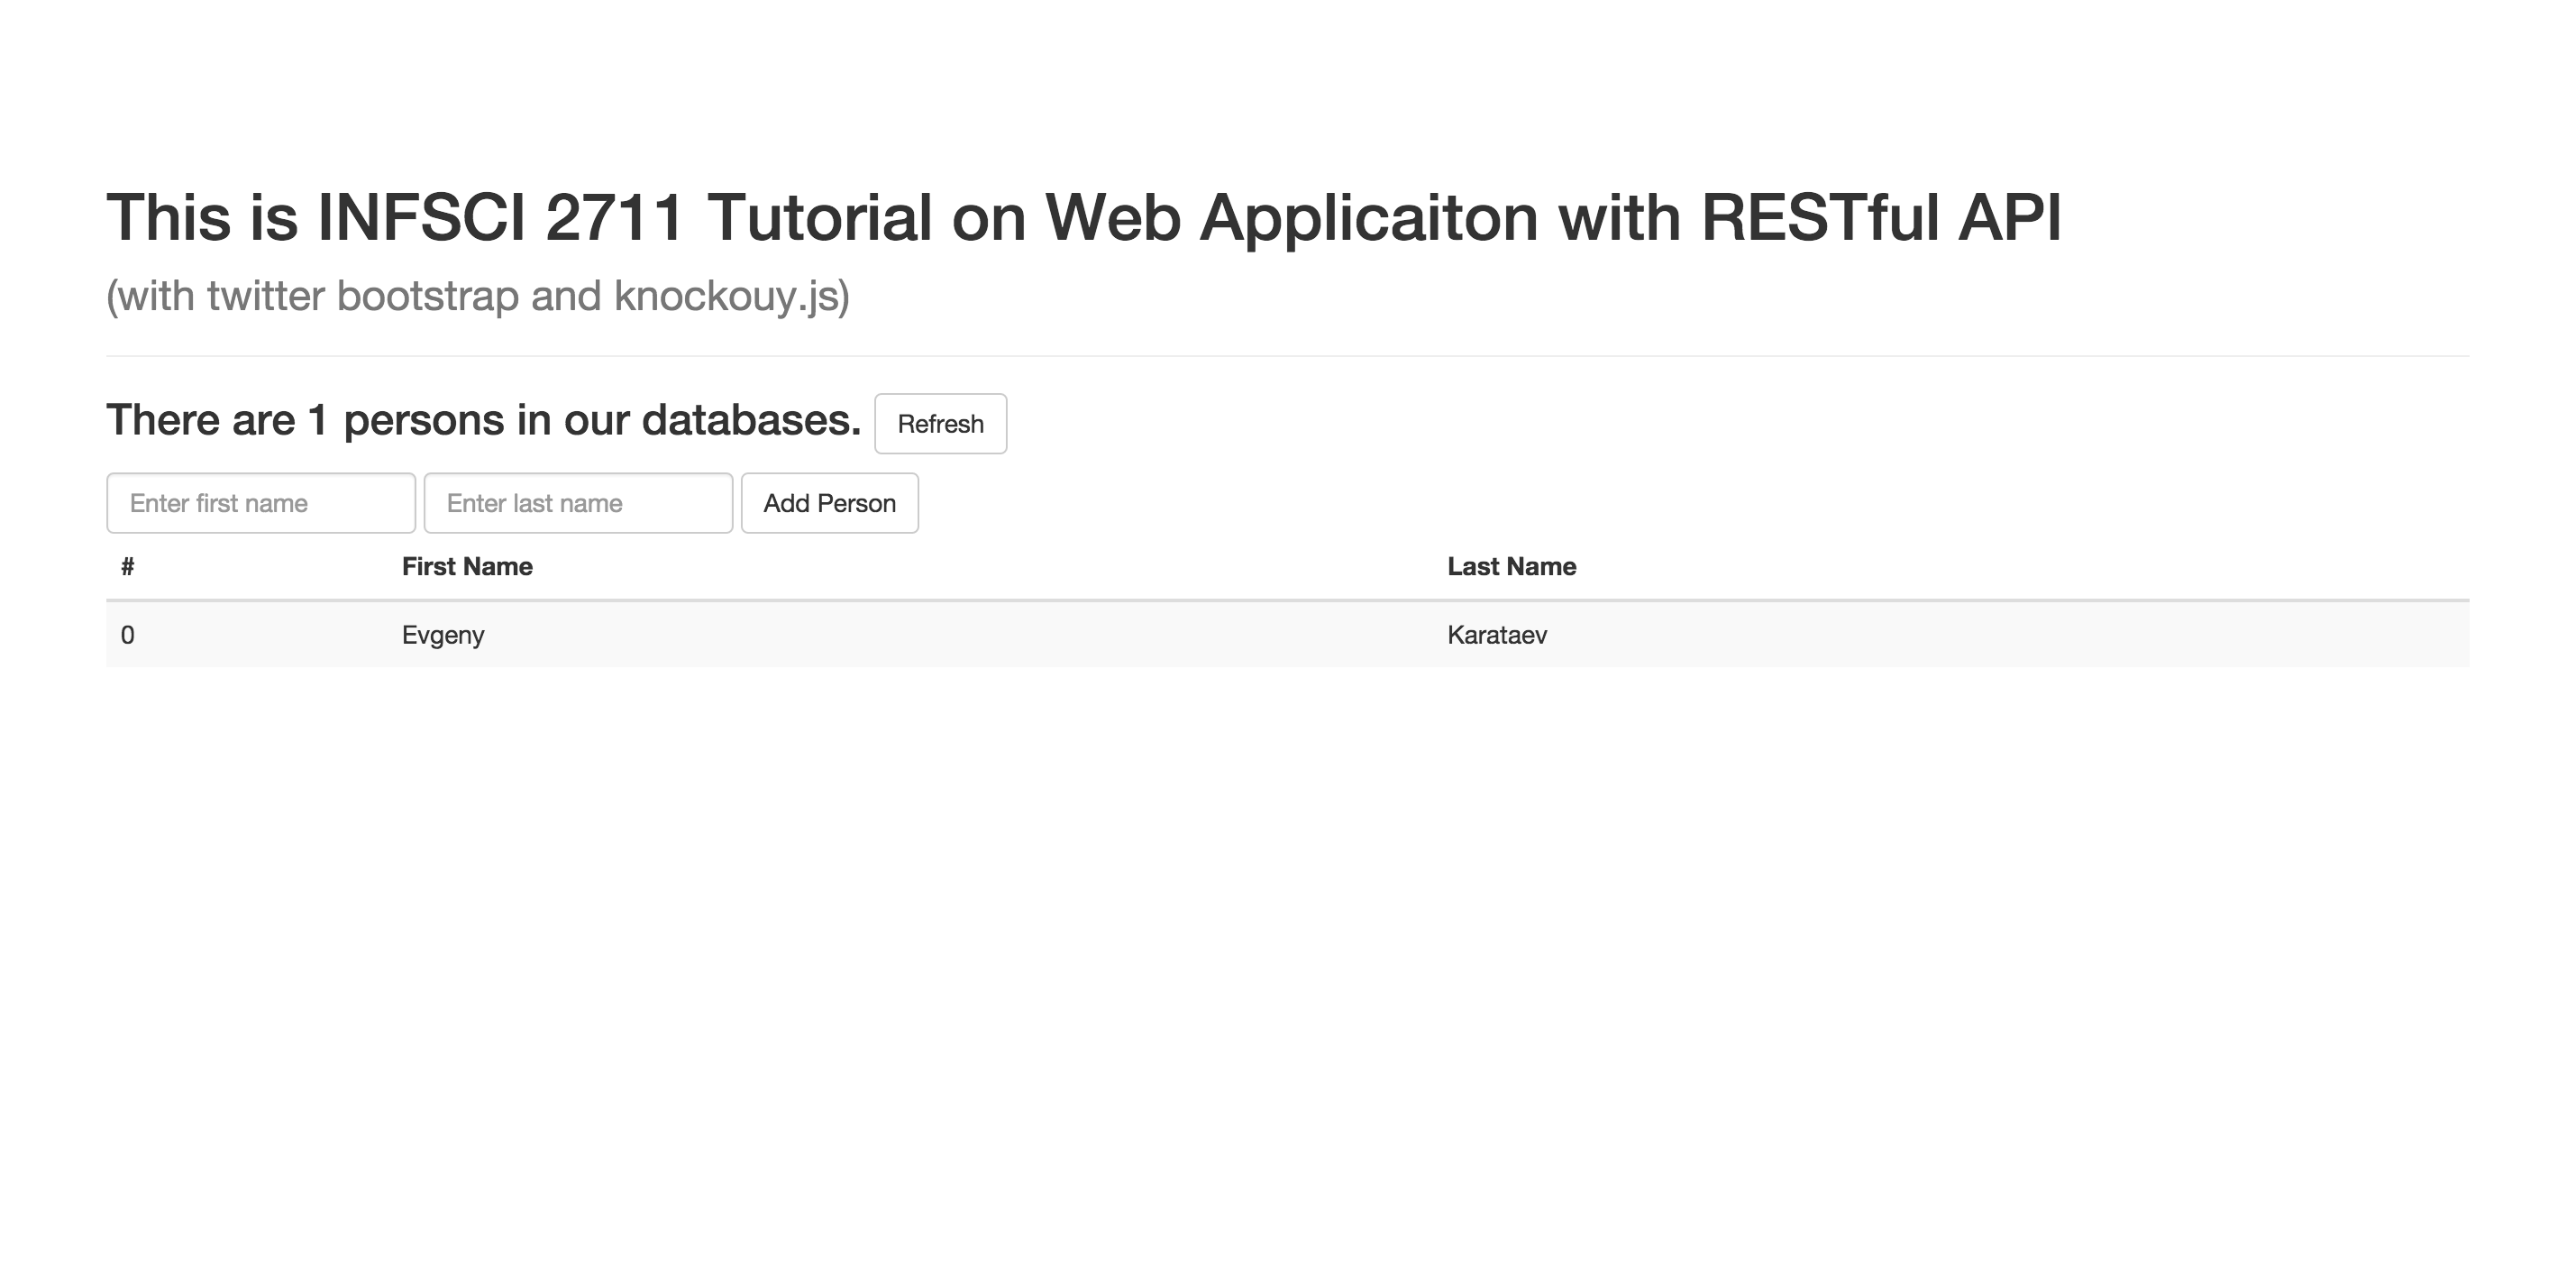
Try to play with it, e.g. add new person, click Refresh button.
To understand how the UI works you only need to understand the knockout.js. For that go over their tutorial. All other parts of the web page are simple.