Tutorial on how to configure servers with external properties file
Intro
Since in our MultiDBs project we have many semi-indpendent components (each group project is almost independent by itself) and those components communicate with each other via REST APIs. The hosts/porsts/API resources where components (projects) run might change at any time, thus we don’t want to hard-wire any external independent information somewhere in the java code.
In this tutorial I will show you how to make your project configurable with a properties file.
MultiDbs-Utils - PropertiesManager class
First of all you need to get latest code for the MultiDBs-Utils project from github. If you are using GitHub client then you need to to Sync on the MultiDBs-Utils project. Also don’t forget to “rebuild” the project on your local machine with maven (the eclipse might do it for your automatically, or you might need to do mvn install by yourself).
Do NOT forget to also update MultiDBs-Utils project on your Ubuntu server on AWS. For that you need to following:
ssh TO_YOUR_SERVER
cd TO_MultiDBs-Utils
git pull
mvn install
Only one person from each group need to update/reinstall MultiDBs-Utils project on AWS servers.
The PropertiesManager class implements Singelton pattern and provides several public methods (an example will be shown below):
-
getInstance() - to use PropertiesManager you don’t need to initialize it, you simple use it as PropertiesManager.getInstance()
-
loadProperties(File propertiesFile) - allows you to load a properties file
-
getStringProperty(String propertyName) - get string property by its name
-
getStringProperty(String propertyName, String defaultValue) - get string property by its name, if property is not found, then the default value is returned
-
getIntProperty(String propertyName) - get int property by its name
-
getIntProperty(String propertyName, int defaultValue) - the same as for string, but return int value and default value is int
Properties file
Properties file is a file with a list of key-value pairs in the “key = value” format. Here is an example (you can also find it here: https://github.com/infsci2711/tutorial/blob/master/TutorialServerAPI/src/main/resources/config.properties):
port = 7654

# the IP and Port of the other project REST API
metastore.rest.base = http://54.152.26.131:7654
#example of the a concrete exposed resources
metastore.rest.getAllDatasources = /datasources
metastore.rest.addDatasource = /datasources/add
The “#” symbols mark comments.
You should use this file to confgire the port of which your JettyJerseyServer runs (see the first line in the above example) as well as configure parameters of other projects that you might need to communicate with via REST APIs. In the example above I provide several properties of the metastore projet which is not my project, but instead the project that I will need to communicate from my code.
As the names suggest here are what those properties means:
-
metastore.rest.base - is the name of the property the value of which is the base of for all REST APIs that metastore exposes
-
metastore.rest.getAllDatasources - is the name of the property the value of which is the resource that metastore exposes to get the list of all datasources
-
metastore.rest.addDatasource - is the name of the property the value of which is the resource that meatstore exposes to add new datasoruce
You will have to add as many properties as required by your project.
How to use properties file
I have added a simple example how to use properties file to the tutorial project (https://github.com/infsci2711/tutorial). Most probably you already have that project on your local machine, so you just need to sync latest changes from github.

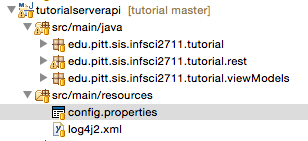
So you need to create config.properties file for your projects and put it into the main/resources folder in the API project.
Then look at the TutorialServer.java file that should look similar to this:
public class TutorialServer {

	private final static String PROPERTY_PORT = "port";
	private final static int DEFAULT_PORT = 7654;

	public static void main(final String[] args) throws Exception {

		if (args.length > 0) {
			String propertiesFilePath = args[0];
			File propertiesFile = new File(propertiesFilePath);
			PropertiesManager.getInstance().loadProperties(propertiesFile);
		}

		final JerseyJettyServer server = new JerseyJettyServer(PropertiesManager.getInstance().getIntProperty(PROPERTY_PORT, DEFAULT_PORT),
				"edu.pitt.sis.infsci2711.tutorial.rest");

		server.start();
	}
}
First of all, the property file path will be passed to the main funciton as the first argument (see below how this is done in Eclipse and when you start your server from command line/terminal). If the property file is provided (args.length > 0), then PropertiesManager loads all properties form that file via PropertiesManager.getInstance().loadProperties(propertiesFile);.
Since the PropertiesManager is a singleton class, you can then use those proporties anywhere in your code (as long as … (not important for us)).
The first example of PropertiesManager usage is when we create new JerseyJettyServer instance. Instead of hard-wiring port number as the first parameter to JerseyJettyServer constructor, I use PropertiesManager.getInstance().getIntProperty(PROPERTY_PORT, DEFAULT_PORT) which will do following:
- It will check if PropertiesManager has propety port (the value of PROPERTY_PORT constant).
- If our config.properties file has the port property defined then the value of that property will be returned. In our config file above the value is 7654.
- If our config.properties file does NOT have the port property defined then the PropertiesManager will return the default value that is provided as second argument (DEFAULT_PORT which is 7654).
In the next tutorial where I will talk about the JerseyClient I will show more examples of PropertiesManager usage.
How to run your project in Eclipse while providing the config.properties file as input argument to the main function.
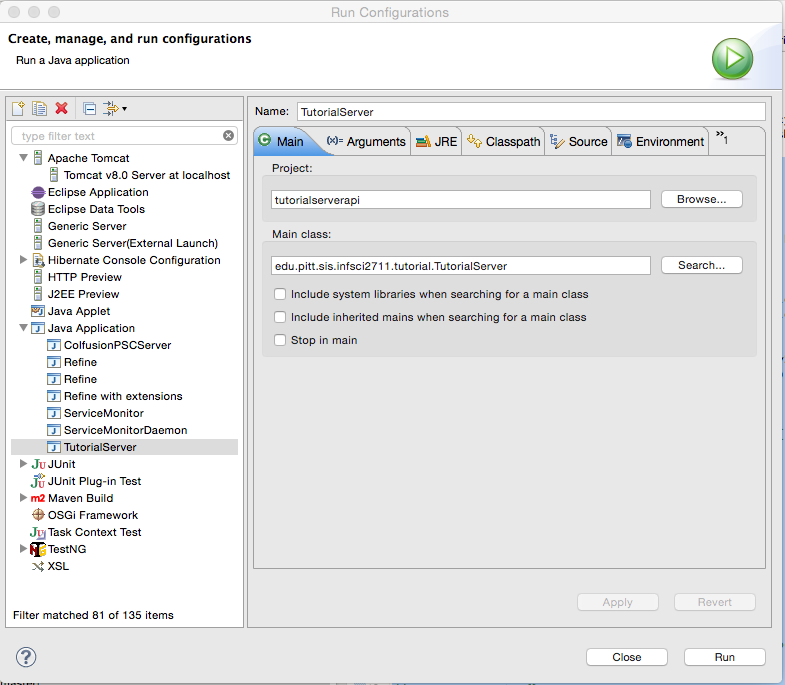
Right click on your server API project (in this example it is tutorialapi project) and select Run As -> Run Configuration.... You should see a pop window similar to this one:

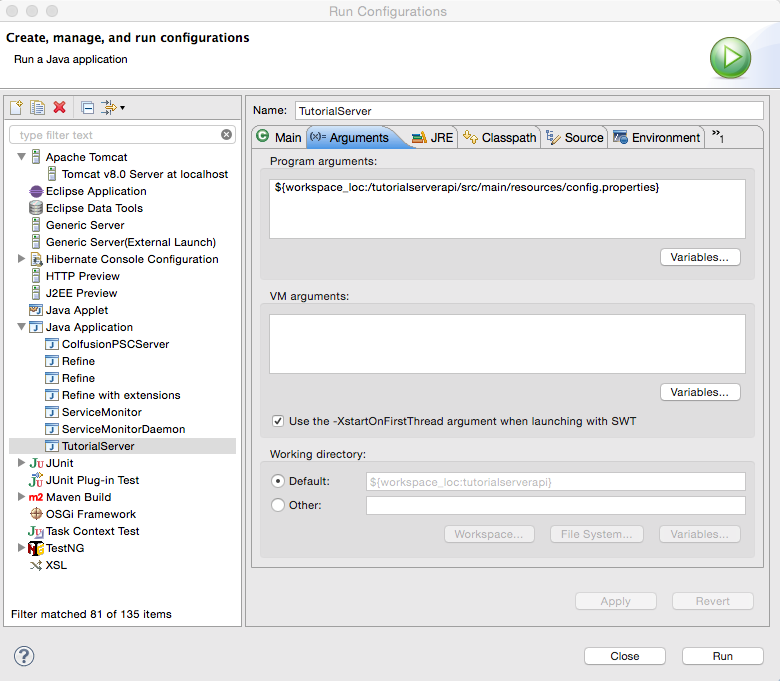
If you don’t have any Java Application run launch configuraiton, then create one by clicking on New launch configuration button. Make sure that Project and Main class are set correctly for your project. Then click on Arguments tab and enter
${workspace_loc:/tutorialserverapi/src/main/resources/config.properties}
in the Program arguments section. NOTE: MAKE SURE YOU CHANGE tutorialapi to your project!!!!!
Then click Apply button and close the Run Configuration window. Then you can run/debug the server code the same way you did before.

How to run your project on Ubuntu server on AWS and provide the config.properties file as input argument to the main function.
To run your server project on the Ubuntu server you need to run almost the same command as before but now you need to provide the path of the properties file to your jar like this:
nohup java -jar tutorialserverapi-0.1-SNAPSHOT.jar PATH_TO_THE_PROPERTIES_FILE > log.out 2> error.log < /dev/null &where PATH_TO_THE_PROPERTIES_FILE is either relative path of the properties file to the jar file or the absolute path.